Last I checked in, we had been using some super fancy and expensive warm 11×14 paper which was not glossy in the least. This was a big issue for drying and curling and we are not currently setup with a proper drying space so we needed to get back to basics. I had originally suggested to my dad that we use the 8×10 but he wanted to go big, I totally agree with him as I love big prints but I just didn’t want to waste more paper as we work out the kinks in our new darkroom. He was able to actually find some 8×10 at a local camera store in Richmond, and I ordered some from B&H as well, with the paper switch up we forged ahead.
We ran into some issues with the negatives this time around. Many years ago when my father was digitizing his negatives, the firm asked him to cut each negative to separate them. Apparently this makes its easier to scan or did at the time. So now we are running into the problem of putting the 120 single negative into the negative holder and as it is only a single negative it’s hard to get it to set properly in the holder. Not much wiggle room.
One of the negatives actually had a border on it created out of electrical tape, which he said is how they used to do it to create a nice clean border on the negative. So we are going to look into finding some and testing it out. I think though, that the more organic border is actually a bit more aesthetically pleasing. It’s like a water mark of proof, that the print was created in water and chemicals and developed, not printed on an inkjet.

Hugh Hefner 1970-something
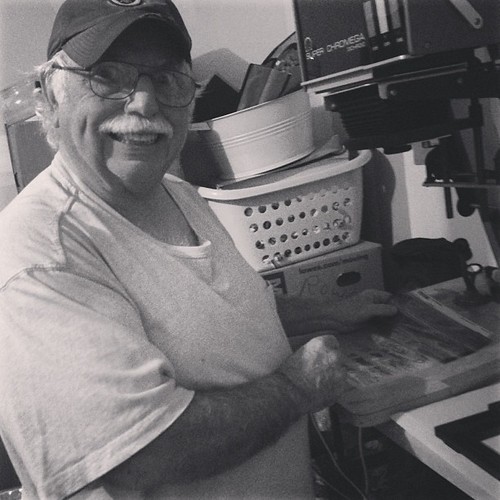
My dad and I really enjoyed being in the darkroom together. It was fun trying out the magenta filter, we pumped it up to 25 and liked the boosted contrast so much we left it there. It reminds me of how in photoshop when I open raw files form my 5D Mark iii I almost always apply the same basic contrast and blacks boost to every file. Setting the magenta on the enlarger was a lot like clicking and sliding those effects in photoshop or Lightroom. It’s so strange the analog vs. the digital, as though each physical step in the process is like a layer in a file.
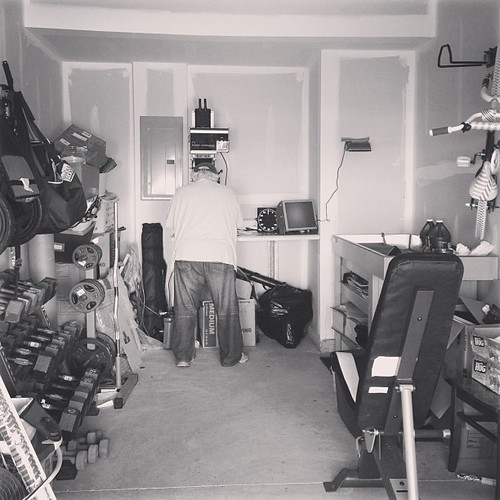
We still need to add a shelf to the right of the enlarger and some drawers below it for more storage.
Next up dad made a contact sheet from some old negatives of a Zeppelin concert from 1973. Five seconds, on f/11 and it did the job. Quick tip: you can use any lens on the enlarger for this, no need to switch it out to anything special. The negatives sit directly on the paper and the negative holder remains empty.
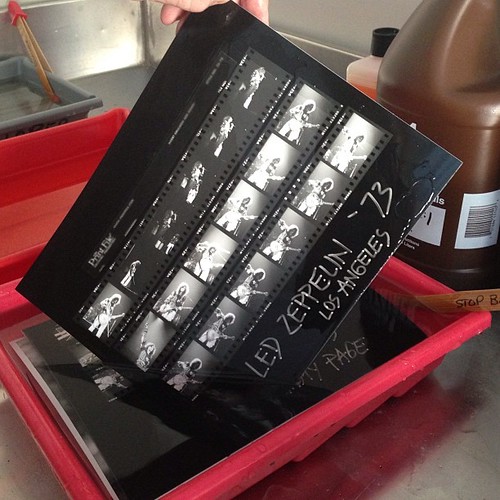
How did the writing get onto the paper? The negatives are in a clear sheet of plastic, and he wrote on that plastic with black sharpie. Then we placed a clear piece of 11×14 glass over both the paper and the negatives to keep them flat.
We used the 8×10 trays this time so we wouldn’t waste any chemicals. My dad says that as far as contamination goes (meaning these 3 containers of chemicals and if its okay if they mix) basically you are okay to go from left to right (though minimize as much as possible), but if you accidentally went right to left, you would have to start all over. As you move the prints from the left to the right there is a natural small amount of contamination, it can’t be helped. He guided me through tilting each print as it was held over the tray to allow the excess to drip off faster, if I held it at a 45 degree angle over the tray. Face down first in each tray for every step.

My dad doesn’t stress about the water temperature too much, if it is off a few degrees he says “that will be fine” and we continue on. I’m not sure if it will become a problem in the winter but it shouldn’t be too hard to adjust it if need be.
Our rinsing solution is super low-fi. We use a larger tray and fill it with water. My driveway is on a slight incline and we place the hose in it and set very low, so that water continues to flow and move around with new coming in and old flowing out. The bike is nearby because I pulled it out of the garage to give us more room inside to work.

The glossy paper is much easier to work with given our messy drying solution, more room for error. I shake the crap out of the prints (my dad kept telling me to stop that I would bend the paper but I was very careful and it was fine) and then I laid them in full sun and placed a few rocks, otherwise the wind kicked up and flipped them over. No squeegee, but we’ll add one to the kit eventually and I know it will make me much happier once we do.

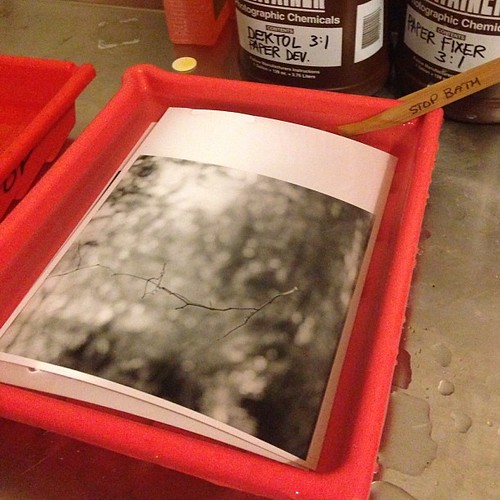
The prints dried in less then 10 minutes after my shaking and a gentle dry with a clean towel. Not advisable but it worked for us. I loved developing the print of Hugh Hefner. The photo itself had a lot of nice contrast, and I am really itching to take some photos of people to try and develop. My father always says, get it right in camera so you don’t have to fix it in the darkroom, and I can nail the exposure in a digital camera but I am not so sure about film. My father can shoot without a meter, and he’s dead on each time. I know I’ll never be as good as he is, his experience can not be matched but I’ll keep striving to get better.